DAPNET Forums Archive › Forums › Equipment Category › Equipment › Customized Logging Arch
- This topic has 5 replies, 4 voices, and was last updated 14 years, 11 months ago by
Pete.
-
AuthorPosts
-
December 11, 2009 at 2:05 am #41163
Does’ Leap
ParticipantI bought a used Forest logging arch a couple of years ago and have been satisfied with its ability to efficiently move logs with minimal draft but found it woefully inadequate in other respects. Here are a few pictures illustrating what I have done to make it more functional.

One of the biggest drawbacks when I initially started using it was where to put my saw (I understand you can now purchase this as an extra). My first attempt was a welded slot that held the plastic scabbard for my saw. The scabbard got torn up and it was awkward. The saw-holder pictured is a 6×6 piece of hemlock which I plunged through and attached to the cart with screws and a welded bracket.

The original seat on the cart was unusable unless you were traveling down a paved road. No suspension – a real lumbar cruncher. I replaced with a cushioned seat with suspension that I use on other implements. The steel backing of the seat was an ideal place to weld hooks for miscellaneous items and a couple of brackets to hold chains. I hated having chains on the deck of my arch. They made it awkward to stand and interfered with the release mechanism.The tool box is a great place to put chaps, water bottle, hat, gloves, etc. I welded some threaded rod to the cart, drilled holes in the tool box and fastened her solid. Pictured is also a smaller box for wrenches etc.
I modified the evener set-up by having a hook whereby I can easily remove it for ground skidding. The original set-up had the evener pinned through the pole and it was difficult to pull the pin b/c of the tension between the cart and pole. I also ground off the rings that attached the single trees to the main evener and replaced them with clevises to skid single.

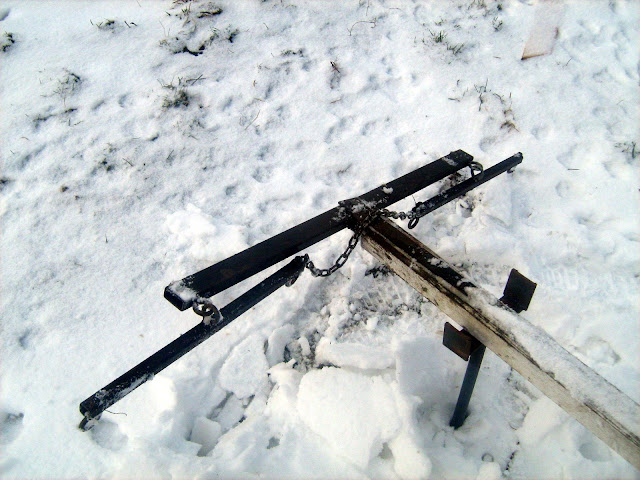
Tired of getting my lines caught on the pole, I made a “plug yoke” designed by Les Barden of New Hampshire. There is a pin that plugs into the end the pole (reinforced with steel). I design cuts about 6″ off the end of the pole which gets me in tighter places and I haven’t had my lines caught on the pole since. The chain between the two yokes is a good thing to grab a hold of while hitching and prevents lines from getting caught on the single yokes.

Part of my motivation behind this post is to encourage others to share things they have done to make working with animals more pleasurable and efficient. What are other folks doing in logging, farming, or other venues?
Cheers.
George
December 11, 2009 at 12:32 pm #55998Mark Cowdrey
ParticipantGeorge,
Some excellent ideas & actions. I used a Forrest arch one winter around here & am familiar W/ all the draw backs you mentioned. I would say for me the step would be the biggest one. I often thought one could be bolted to the holes for the draw-bar on one of the standards. Here’s an “atta boy” for you!
BTW, can anyone tell me how to post pictures that don’t come out huge?
Mark
December 11, 2009 at 12:55 pm #55999Does’ Leap
ParticipantMark:
I post my pictures on picassa.com. Once you have the picture on picassa (or any other picture hosting website), right click on the picture, select properties, and copy the http/ address. In your message on DAP, click insert image and paste the http/ address in (make sure the http address is followed by the jpg extension at the end). It should come out normal size.
George
December 11, 2009 at 6:44 pm #56002Pete
ParticipantNICE job George.
December 17, 2009 at 12:49 am #56001Hoss
ParticipantGeorge, Have you had any trouble keeping the bead around the tire and rim from rusting? I have an arch like yours and seems like I’m at the tire shop every month trying to keep air in the tire. I may have to replace the rims, but they both still look fairly good.
ThanksDecember 17, 2009 at 11:35 am #56000Does’ Leap
ParticipantSo far so good with the tires.
George
-
AuthorPosts
- You must be logged in to reply to this topic.