DAPNET Forums Archive › Forums › Draft Animal Power › Horses › Barden style neck yoke
- This topic has 25 replies, 9 voices, and was last updated 8 years, 4 months ago by
Ron.
- AuthorPosts
- January 4, 2010 at 12:43 am #41271
Mark Cowdrey
ParticipantAnyone who uses this style yoke and would be willing to post a good photo and some dimensions & stock sizes I would appreciate it. I think I’m ready to switch to plug style.
(George, I don’t think either a tape measure or camera weigh over 5 lbs.!:D Feel better soon.)
Thanks,
Mark
January 4, 2010 at 1:39 pm #56754Does’ Leap
Participant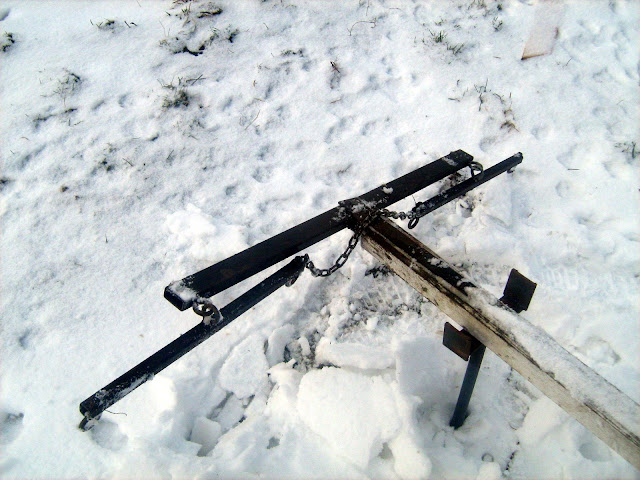
Mark:First of all, I really like this design – it is well worth the effort. The main yoke is 2×1 stock, the single yokes 1×1. The thickness of this stock if fairly standard (3/16ths ?). The the eye bolts (all of them on all parts of the yoke are threaded 3/8″ thick with a 3/4″ – 1″ eye) on your single yokes are 24″ OC. The distance of the eyes on the main yoke would need to match your evener (I run a 42″ evener). The eye bolts are drilled through the stock and secured with a weld on the nut and eye side. I had someone with a tire chain tool open up one set of eyes and then close them together in less than a minute or you can heat them up (minimally) and close them yourself. This is where the main and single yokes are attached together via the eyes. I forget the chain i used between the single yokes, but slide them over the threaded part of the eye bolts, nut and weld. This prevents the lines from getting caught and is a good handle.
The piece that receives the yoke and plug is 3″ long looking down at the yoke and 2″ wide. This is eventually a u shaped piece that fits around the main yoke with minimal room that the yoke can move back and forth. Drill through both the u-shaped piece and the main yoke, nut and weld a 1/2 bolt. Before you do this, drill a 5/8 hole in the bottom of u and 5/8 x 5″ grade-8 bolt and weld it. This is your plug. Drill a 11/16″ hole through your pole and secure all the way around with 1/4″ stock, carriage bolted through the pole with a 5/8 hole to receive the yoke. Call with questions and I can explain better than writing (802.827.3046).
Good luck.
January 4, 2010 at 5:47 pm #56762LostFarmer
ParticipantMy double trees are made very similar with the rectangular tube. I have never seen a side backer or D-ring harness in action. It just isn’t common in this area. You will see many hip britchens on a belly backer but not may side backer harnesses of any kind. Thanks for taking the time to share. Interesting stuff. LF
January 5, 2010 at 3:39 am #56745ParticipantGeorge, thanks for this. Perhaps we can clarify a little here for the benefit of all if you are inclined.
The first paragraph about the yoke itself is clear to me. I lose you a little on the mounting arrangement described in paragraph 2.
“The piece that receives the yoke and plug is 3″ long looking down at the yoke and 2″ wide. This is eventually a u shaped piece that fits around the main yoke with minimal room that the yoke can move back and forth. Drill through both the u-shaped piece and the main yoke, nut and weld a 1/2 bolt. Before you do this, drill a 5/8 hole in the bottom of u and [insert??]5/8 x 5″ grade-8 bolt and weld it. This is your plug. Drill a 11/16″ hole [into the end of??] your pole and secure all the way around with 1/4″ stock, carriage bolted through the pole with a 5/8 hole to receive the yoke.”
“secure all the way around…” Does this mean another “U” shaped piece that “caps” the end of the pole? Or more of a box shape that entirely covers the end of the pole? Or something else?
Thanks George, I hope you’re feeling better.
Mark
January 5, 2010 at 12:43 pm #56755Participant@Mark Cowdrey 14215 wrote:
“secure all the way around…” Does this mean another “U” shaped piece that “caps” the end of the pole? Or more of a box shape that entirely covers the end of the pole? Or something else?
MarkYes, this is another u-shaped piece that caps the pole and provides support for the yoke. I start by drilling the end of my pole dead center, then cutting a piece of steel that goes on the end w/ a 5/8″ hole to receive the plug. I put the plug through the cut piece of steel into the pole and then weld my top and bottom pieces to the end piece. Then drill out this piece and secure with carriage bolts.
George
January 6, 2010 at 1:34 am #56744ParticipantThanks George, I think I’ve got it.
Mark
January 6, 2010 at 4:48 pm #56759LStone
ParticipantMark, I have one very similar want me to run it up to you to eyeball? It has a ring though not a plug in style.
March 2, 2010 at 10:19 am #56756ParticipantMark:
Did you ever make the yoke? If so, how is it working for you?
George
March 2, 2010 at 11:53 am #56746ParticipantGeorge,
My Dad was a great one for expressing his experience & outlook in aphorisms and pithy sayings. The two I heard most often directed at me were: “You’re like a damn bull in a china shop!” and “The grass is always greener on the other side of the fence.”
Regarding this thread it would be: “The road to Hell is paved with good intentions.” I guess I know where I’m headed.In other words, not yet but it’s still on the list.
Mark
October 28, 2010 at 11:02 am #56747ParticipantGeorge, Larry and everyone,
Is there any reason you can think of that I couldn’t use clipped chain links rather than eyebolts to join my jockey yokes to the neck yoke? Would be less expensive and not require drilling.
Thanks,
MarkOctober 28, 2010 at 12:58 pm #56753Marshall
ParticipantI don’t see why it wouldn’t work as long as you have strong welds.
October 28, 2010 at 2:08 pm #56760ParticipantHi Mark. Thinking it doesn’t matter too much what you use. The only real stress it bears is if you pick the yoke up by the chain with the pole weight to hitch or let it hang by one side of the yoke when unhitching. The rest of the time it just hangs out. My understanding of the main purpose is just to keep the cross lines from dropping in between the yokes when slack and snagging up in there when taught. I have one that is a large dog choke collar cut to length and bolted through connecting the metal yokes. I have another that is the same that I left the ends intact and used quick links to connect to the metal ends of wooden jockey yokes together. It is rather slack but it works. I noticed in Tunbridge that Carl’s take on it is to forego the jockey yokes and just hook to a single steel pipe in four places. He posted a pic here that gives a good look
http://www.draftanimalpower.com/photoplog/index.php?n=122
So I guess if you are shooting, aim and pull. If you land between baling string and a pipe you can call it good.It must be kinda like being an artist.
talk to you soon.October 28, 2010 at 2:30 pm #56761ParticipantMisread your question Mark. Helps to have the glasses in front of the eyes and not on the forehead. Like Marshall said it would have to be a strong mechanical (welded) connection whatever you used. That is going to bear the weight of the pole, the tension between the side straps and the D-ring. The ever present swaying stress is substantial too.
October 28, 2010 at 2:44 pm #56743Carl Russell
ModeratorLStone;21629 wrote:….. I noticed in Tunbridge that Carl’s take on it is to forego the jockey yokes and just hook to a single steel pipe in four places. …..Sorry Larry, that is not quite right. I have a typical neck yoke with jockey yokes. The difference is that it is a spread chain, and I twist it to wrap the chain in order to shorten the hitch….. so it may look like a straight yoke is some cases.

Carl
October 28, 2010 at 7:14 pm #567638BitFarm
Participantsorry to hijack if i am, but can anyone explain the advantages of this setup to me? I’ve never seen it before, and am intrigued, I’d love to know why it’s prefereable(or not) to the usual yoke arrangement. Thanks!
- AuthorPosts
- You must be logged in to reply to this topic.