DAPNET Forums Archive › Forums › Draft Animal Power › Horses › Barden style neck yoke
- This topic has 25 replies, 9 voices, and was last updated 8 years, 4 months ago by
Ron.
- AuthorPosts
- October 28, 2010 at 9:17 pm #56748
Mark Cowdrey
ParticipantHey George,
Would you be willing to post close up photos of the center of the yoke with the pin, not installed on the pole, and the end of the pole showing “…secure all the way around with 1/4″ stock, carriage bolted through the pole…”. I’m particularly interested in the relationship of the carriage bolts through the pole to the 11/16 hole for the pin.Thanks,
MarkOctober 28, 2010 at 9:23 pm #56749Participant8bit,
There are two main advantages that I see to this setup.
First is shortening the pole out in front of the horses to make it easier to get around in tight quarters, particularly in the woods.
Second, and it could be used on a conventional jockey yoke setup as well, is the chain between the jockey yokes prevents the cross checks from getting caught under the ends of the jockey yoke. (As Larry pointed out.)
Both features are well demonstrated in Les Barden’s D-Ring Harness video.Others may have additional reasons.
Mark
PS. Never worry about high-jacking a thread, questions are great.
October 28, 2010 at 11:53 pm #56742Gabe Ayers
KeymasterMark-
I use this design in the woods and fields, and I really like it. It makes for a short pole, and the Barden design is simple and easy to use. I have a paper copy of the plans I used, which were given to me by Ben Canonica, based on Les’ original. I can mail them if you want – they are very detailed and easy to follow. I did make a few small changes, but not much.October 29, 2010 at 1:01 am #56750ParticipantBrad,
That would be great, i would appreciate it.
Thanks,
MarkOctober 29, 2010 at 12:59 pm #56757Does’ Leap
ParticipantMark:
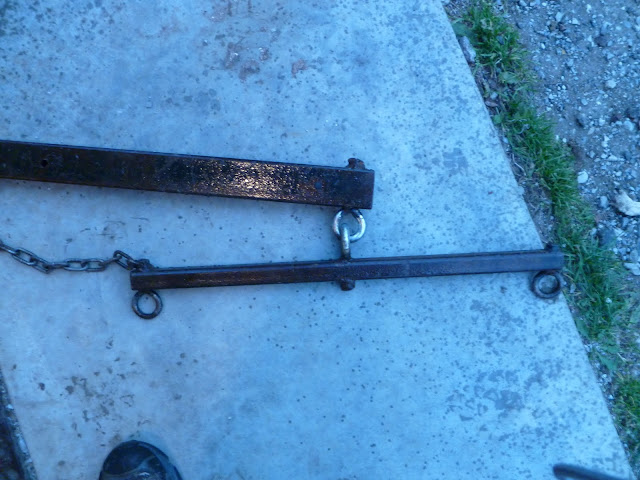
Here are some pictures. That piece pictured below is 2″ wide by 3″ long. That is a 3/8 bolt pinning that piece to the main yoke. The nut is welded to the bolt.
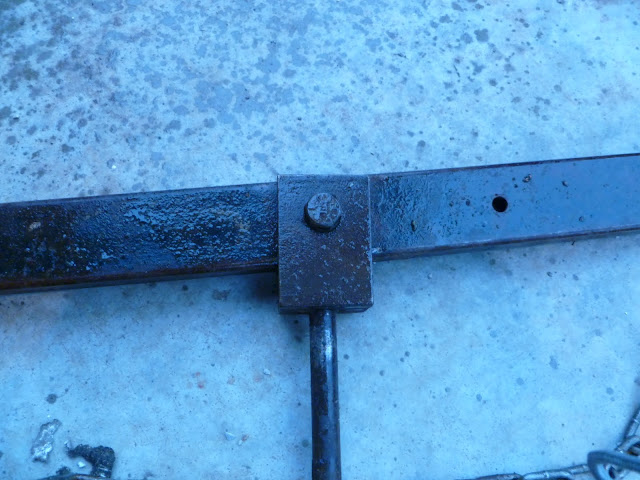
This is a side view. I took 2×3 angle iron and welded a piece of flat bar to make a space for the yoke. The space is about 1 1/16″ to enable free movement. The main pin that goes in your pole is a grade 8, 5/8 x 5.5 ” hex bolt. It is welded to the inside of the channel.
If I understand your previous about using a piece of chain vs. eye bolts, I would say no – the more rugged the better. Les’s plans call for 3/8 eye bolts. I wore through these in 14 months and replaced them with 1/2 eye bolts (see below). The eye bolts that attach to your harness can stay 3/8, but where the two are attached, I would go 1/2″. I fellow with a tire chain tool joined these eye bolts together for me inside 30 seconds.
Good luck.
George
October 31, 2010 at 2:02 pm #56751ParticipantGeorge,
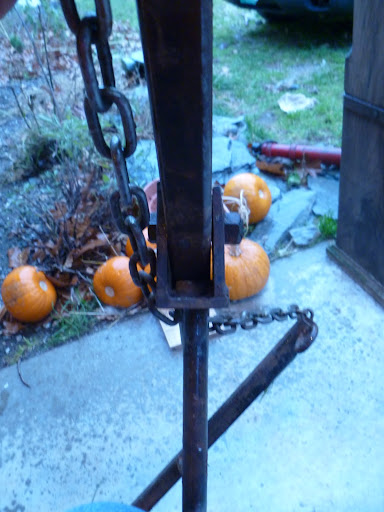
Thanks for the pictures & the thoughts on the eye bolts vs. chain links.The visual piece I am missing is the end of the pole. Does the steel wrap completely around the pole like a socket or just top & bottom or just each side? What is the relationship between the hole that receives the 5/8 bolt on the yoke to the holes for the carriage bolts that secure the piece to the wooden pole? How many carriage bolts are there & what diameter?
Thanks for your help & your patience.
MarkOctober 31, 2010 at 7:25 pm #56758ParticipantMark:
Here’s what I did:
- Cut a length of 1/4 flat bar to match the thickness of your pole at the end where you insert your yoke (I think I used
- 1/4 x 3″ );
- drill a 5/8″ hold dead center on that steel piece.
- Drill a 5/8 hole dead center on the end of your pole. Wiggle your bit as your drilling to facilitate the easy insertion of the yoke.
- Now put your yoke through the plate and into the pole as if you were going to hook your horses.
- Cut 2 8″ pieces of the same flat bar and drill 2 5/16″ holes @ 6″ and 7 3/4″. These are the top and bottom pieces for the end of your pole;
- Clamp the top piece to your pole and drill straight through the pole. Line your bottom piece up with the holes and bolt with 5/16 carraige bolts.
- Now weld the top and bottom piece to the cap with the 5/8 hole in it.
Good luck. If this doesn’t make sense, I will snap some more pictures.
George
October 31, 2010 at 7:46 pm #56752ParticipantGeorge,
Got it.
Thanks again,
MarkJanuary 14, 2016 at 11:33 pm #87261ParticipantI’ll revive this old thread and try posting another photo of my pole end piece.
January 14, 2016 at 11:34 pm #87262ParticipantOh well. I’ll wait til Devin figures out my issue.
January 15, 2016 at 8:35 am #87264Ron
Participanthi all
I am not very good with a computer so this may be my fault but this topic would be so much easier to follow if the pictures posted would work? Is this my misunderstanding? This is a very good
discussion but I can’t see most of what is pictorially being posted? If this was a collar or a set of traces, a chainsaw I could adjust this correctly but when it comes to computers I am lost in the woods. Can anyone tell me how to see the pictures?
Cheers
Ron - AuthorPosts
- You must be logged in to reply to this topic.